


Seldom do you find a recipe with so few ingredients and such awesome results as the humble johnnycake. What’s a johnnycake, you ask?
Think of it as a pancake made with cornmeal instead of wheat flour. That’s the simplest way of putting it, but like any old recipe, the johnnycake has as many interpretations as it does spellings. (You might also see it as “Johnny cake,” “jonnycakes” or even “journey cake,” an apparent variation for when these were eaten by travelers long before their cross-country trips were in vehicles running on gasoline.)
In their purest form, johnnycakes are made with just four things: cornmeal, salt, sugar and water. That’s it.
Unlike muffins or even the good ol’ pancake, johnnycakes require no leavening agent — that’s a fancy way of saying stuff like baking powder or yeast, which makes baked goods puff and rise.
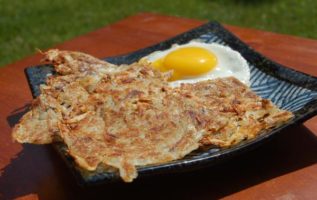
No, johnnycakes come alive with just a few ingredients mixed together and then cooked in a skillet — you don’t even need an oven, for crying out loud! What you’ll end up with is a delicious, hearty oval similar to cornbread that’s crunchy on the outside and moist within.
Now that I’ve hopefully sold you on the merits of johnnycakes, you might be wondering when to eat them. I think the more appropriate question is, When can’t you eat them? Johnnycakes have the unique characteristic of being great eaten as either a savory food or as a sweet one.
For example, for a savory application, you could serve them alongside a main dish like chili, stew or pot roast. Or, for a sweet treat, soak them in maple syrup or jam, and you may never go back to pancakes.
Finally, johnnycakes are as easy to make as they are inexpensive. We’re talking cents, not dollars for the ingredients. Plus, you probably already have all the ingredients necessary to make them your cupboard. Here’s how to do it:
Just Can’t Wait Johnnycakes
(Serves 2 or 3 — or 1 if you are starving and/or selfish)
Ingredients:
- 1 cup of yellow cornmeal
- 1 teaspoon brown sugar
- 1 teaspoon salt
- 2 cups (16 ounces) of boiling water (use less if necessary, and see note below)

Step 1: Grab a big bowl and toss in the cornmeal, brown sugar, and salt. Stir it with a whisk. (If you don’t have one, a fork works, too.)

Step 2: Boil the water and slowly pour it into the cornmeal mixture, stirring as you pour. Make sure it’s all combined and smooth. Stir until it thickens, about 30 seconds. You want it to look like wet sand. Put on some music or start a load of laundry — you want this to rest for about 10 minutes, uncovered.
UPDATE, 3/20: I’ve heard from some readers (see comments below) of the mixture turning out too thin. First, make sure you are using cornmeal, not corn flour, and that the water is boiling when poured into the cornmeal for best absorption. Then be sure to whisk vigorously, for at least 30 seconds. This is not like pancake batter, where you mix for only a moment.
The cornmeal should absorb a majority of the water as you stir quickly and continually with a whisk or fork. Add 1 to 1.5 cups of the water first to create that “wet sand” consistency if you aren’t sure. Or, on the other hand, you can always add more cornmeal to get to that stage if the batter still seems thin after following these steps.

Step 3: Heat a nonstick pan over medium heat. If you have a griddle such as the one above, that works even better ’cause there’s a lot of space to cook on it. They don’t cost all that much and have a ton of uses, too, such as making grilled cheese sandwiches, frying bacon and cooking large quantities of egges. The one pictured here is a Simply Calphalon model I got at Target back when they carried these models. I think I got this one for $40 or $50.

Step 4: Anyway, spread some butter all over the pan with a spatula and scoop the batter into a mound about the size of a ping-pong ball. I like to use an ice cream scooper for this.

Step 5: Gently press each mound so it flattens (I spray some Pam on the back of the spatula so the batter doesn’t stick to it). Each disc shouldn’t be more than half an inch thick. Don’t worry if it’s not like a perfect circle or oval; it’s the taste that matters, not the look. Cook for 10 minutes over medium-low heat and be sure to turn on your hood fan, as the butter might smoke a bit.

Step 6: Almost there. After about 10 minutes, one side of the cakes will be brown. Now simply turn and cook another 10 minutes or so until the other side is brown and crispy. For added brownness and taste, you can put a thin pat of butter on each johnnycake before turning it over.
And that, my friends, is how you make johnnycakes. Arrange them on a platter and serve immediately, savory or sweet. Again, I love these with maple syrup, as pictured at top, and I’m sure you’ll find your own uses for them.
Try varying the recipe with more or less sugar depending on how much sweetness you like, or even try adding herbs such as dried oregano or, for some spice, a bit of cayenne pepper powder. However you enjoy them, I think you’ll find this recipe easy, cheap, and most of all, delicious.
Did you try this recipe? Write about your experience, ask questions or share advice in the comments area below.
Source: iwanttocook.com (defunct blog)

