


Every year for the rest of my life, I want a fruity cheesecake. I love the way layer cakes look, but there’s something about the texture of cake that isn’t my favorite. Maybe I had too many dry grocery store cakes as a kid, so even though I’ve had good, moist cakes, I always have the idea that cake is going to suck the moisture out of my mouth. Eating some cakes is like eating all the sand in the Sahara.
Backtracking a bit, I turned 25 on December 27th! 25 seems like a pretty cool age to be. It’s a quarter of a century. It seems more “adult” than 24, but not “old.” Unless you’re a model, in which case your days would be numbered by now. Thankfully, I am nothing close to being a model, so I get to continue being a contributing member of society for a while. (No offense, models. I know a lot of you go on to do awesome things in your post-modeling days. Here’s lookin’ at you, Tyra!)

The thought of models reading my blog just cracked me up. Models, you probably can’t eat this cheesecake. Which is really sad for you, because it’s delicious. No. You know what, models? You’re allowed to eat cheesecake and whatever else you want. I’m not here to put restrictions on you or your body. Tell your agent, “Screw off. I’ll eat all the cheesecake I want. It’s Maria’s em-effin’ birthday.” You tell ’em that.
It’s my party and I’ll be weird and pretend I’m talking to models if I want to.

Getting off the model tangent, let’s get back to cheesecake. Cheesecake is my all time favorite dessert, especially when there is fruit involved. For some reason, The Cheesecake Factory has found a way to incorporate chocolate, caramel, and peanut butter into, like, 80% of their cheesecakes. I don’t need all that richness, yo. There’s two pounds of cream cheese in here already. Add chocolate and it’s Coma Time.
I hemmed and hawed about what kind of cheesecake to make, when all I really wanted was a plain cheesecake with raspberry sauce. But raspberries aren’t in season, said my brain. And then my glowing birthday heart said, Who even cares? You only turn 25 once! But because I never leave well enough alone, I went nuts and bought a bunch of blood oranges at the store, because blood oranges are the bombdiggity. (Ahem, is my age showing?)

Sometimes I just love my gild-the-lily nature. Adding blood orange to this cheesecake made it Next Level Delicious™. NLD for short. Let’s make that a thing. It will be my “Bam!” (Dear Emeril, let’s get married.)
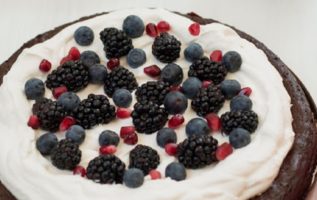
The blood orange also imparted an nice golden tone to the cheesecake, which looked totes gorg. Especially with these pink streamers and gold candles! I loved setting up this photoshoot. It looks like I threw myself a lonely birthday party for one. Which I guess is tantamount to what really happened. Sad face. Happy face: more cheesecake for me, bitchez.

BLOOD ORANGE & RASPBERRY CHEESECAKE
- 9 graham cracker sheets (140 grams)
- 4 tablespoons (57 grams) unsalted butter, melted
- 2 teaspoons cornstarch
- 1 tablespoon cold water
- 2 cups (220 grams) fresh raspberries*
- ¼ cup (50 grams) granulated sugar
- 1 tablespoon blood orange juice, pulp strained out**
- 2 pounds (900 grams) cream cheese, at room temperature
- 1¼ cups (250 grams) granulated sugar
- zest from one medium blood orange
- 4 large eggs, at room temperature
- 3 tablespoons blood orange juice, pulp strained out
- 1 teaspoon vanilla extract
- ¼ cup (60 grams) heavy cream
- ¼ cup (60 grams) sour cream
- several cups of boiling water
- fresh raspberries, for garnish (optional)
- Preheat oven to 350°F. In a food processor, process graham cracker sheets into fine crumbs. Pour in melted butter and pulse until the mixture clumps a little and resembles wet sand. Press evenly into the bottom of a 9-inch springform pan. Bake for 10 minutes, then remove to a wire rack to cool. Reduce the oven temperature to 325°F. Clean your food processor bowl and blade, as you will use it again shortly. (Alternatively, you can crush the graham crackers by hand and stir in the butter so you don’t have to clean your food processor bowl between steps.)
- In a small bowl, fork whisk cornstarch and water and set aside. Combine raspberries, ¼ cup (50 grams) granulated sugar, and 1 tablespoon blood orange juice in a medium saucepan. Cook for 5 minutes over medium heat, crushing the berries with a spoon as they cook down. Stir in cornstarch slurry, then bring to a boil. Cook for another 1-2 minutes until sauce thickens, continuing to crush any larger raspberry pieces. Strain sauce through a fine mesh sieve into a medium bowl to remove the seeds, pressing with the back of a spoon to push all the liquid through the sieve. Discard seeds and set sauce aside.
- In the bowl of a stand mixer fitted with the paddle attachment, beat cream cheese until smooth and creamy. Combine 1¼ cups (250 grams) granulated sugar and blood orange zest in the clean bowl of your food processor and pulse a few times to infuse the sugar with the citrus oils. The sugar will turn light orange and look slightly wet. Dump the citrus sugar into the cream cheese and beat on medium-high speed for 3 minutes, until the mixture is light and fluffy, scraping down the sides and bottom of the bowl once.
- Add eggs one at a time, beating until just incorporated, then scraping down the sides and bottom of the bowl in between each addition. Add 3 tablespoons blood orange juice and the vanilla extract and mix until just combined. Remove the bowl from the stand mixer and stir in heavy cream and sour cream by hand with your rubber spatula.
- Place your springform pan inside a 10-inch cake pan orthoroughly wrap the bottom of the springform pan with a couple layers of heavy duty aluminum foil.*** Pour cheesecake filling into your springform pan and jiggle slightly to even out the top. Drizzle your raspberry sauce over the top. With a butter knife, drag the raspberry sauce in a zig zag pattern, up and down and left to right, to create a marbled effect on the surface of the cheesecake. Don’t put the knife in all the way to the bottom or you’ll dig up your graham cracker crust.
- Place the springform pan (encased in a cake pan or foil) into a large roasting pan and place on the middle rack of your oven. Carefully pour boiling water into the roasting pan until the water comes about halfway up the sides of the springform pan. Bake for 75-90 minutes, until the edges are set, but the center jiggles a bit. Turn off the heat, prop the oven door open with the handle of a wooden spoon, and let the cheesecake rest in the oven for 1 hour. Carefully remove the springform pan from the water bath and set it on a wire rack to cool to room temperature. Cover and refrigerate until chilled, at least 4 hours.
- When ready to serve, carefully run a small offset spatula around the edge of the cheesecake to loosen the sides. Unlatch the springform ring and remove it. Place fresh raspberries on the top for garnish, if desired.
- *Frozen raspberries, thawed, would probably work, as well!
- **The total amount of blood orange juice in the whole recipe is about the yield from one medium blood orange (4 tablespoons total).
- ***I am really bad at wrapping springform pans in foil and I always spring a leak, so I invested in a 10×3-inch cake pan to use when making cheesecake. If you make a lot of cheesecakes, it’s worth the $15!

