Confession: Much of my high school senior year was spent at the beach. During class hours. Yes, while I should have been absorbing formal education, I and a group of friends were instead absorbing sun, sand and most of all the ocean. We never skipped the whole day – just some selected classes we decided we’d rather not attend, or perhaps we were just dealing with teen angst the best way we knew how.
Our thinking was that nature’s saline solution that we knew as the Pacific could cure all life’s ills. And magically, somehow that saltwater did indeed make us feel better every time we took a dip.
Turns out, at least from a culinary standpoint, we were on to something. Saltwater really is magical stuff. While each component alone has too many uses to mention in the kitchen – water is used for everything from steaming to making stocks, and salt for everything from preserving to insulating – when used in tandem, they work a magic all their own.
Water mixed with salt is known as a brine, and it’s a classic way of making food flavorful even before the cooking process begins. Brining becomes especially popular this time of year because of Thanksgiving, when the process is used for turkeys.
If you’ve ever had a turkey that’s been brined, you probably already know the results: a bird that is moist and exceptionally flavorful, traits that brines help create. All done ever so simply by submerging food for hours in water and salt (you can experiment with other seasonings, too, from brown sugar to peppercorns).
Yet I sense your hesitation. “What if I get this whole brining thing wrong on the big day? Domino’s may not be able to rescue me if somehow I end up with a waterlogged turkey.”
No worries. Here’s what we’re going to do: practice. And not on a turkey, but something smaller and more manageable: a chicken.
This way, we’ll get familiar with the brining and roasting process – both easy, I promise – and then if you choose to brine and roast a turkey for T-day, it will be a whole lot simpler.
All you’ll need is the requisite salt, water and a whole chicken (found wrapped in plastic at almost any supermarket), and a bowl that’s large enough to hold it but still fits in the fridge. Aside from an oven, you’ll also need about 6 to 12 hours so the bird can soak in the solution. I usually just leave it in the fridge overnight.
Now, let’s brine and roast.
BRINED AND ROASTED WHOLE CHICKEN
- 64 ounces of water, or enough to cover chicken
- Half-cup table salt, with more on hand if needed
- 1 whole chicken, 3-5 pounds
- Half a lemon
- Half an onion
- 1 teaspoon ground pepper
- Optional: Veggies and dry herbs such as rosemary
- Music to make it by: The Police
Step 1: Unwrap the chicken, reach into the cavity and remove the “parts” – heart, liver, neck, etc. – and rinse the entire bird inside and out under cold water. Regarding those giblets, toss if you want, or cook with the chicken. My dog loves some of these.
Step 2: Put the chicken in a big, nonreactive bowl, such as plastic, stainless steel or stoneware. Fill with water to cover the chicken, add the salt and stir to dissolve. The usual ratio for a brine is 1 cup salt per 1 gallon of water. There, you just made one.
Step 3: Cover and let soak overnight in the fridge.
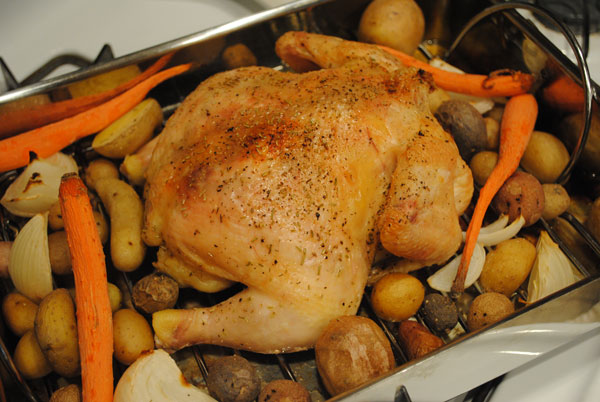
Step 4. Preheat oven to 375 degrees. Remove chicken from brine, rinse and pat dry. Toss the brining solution and remember to clean anything that comes in contact with raw chicken. Put the chicken in roasting pan, stuff cavity with lemon and onion, and sprinkle pepper all over. You can add a little oil if you want for a crisper skin and to help the pepper stick. I like to add vegetables for a complete meal, and rosemary on the chicken for added flavor.
Step 5: Roast in the oven until done, when the thigh reaches a temperature of at least 165 degrees as measured with a thermometer. A good estimate is 15 to 20 minutes in the oven per pound of chicken, and remember, ovens will vary. If skin browns too quickly, cover with foil.
Congratulations: You just brined and roasted a chicken. Once cooked, carefully remove from oven and let the chicken rest for about 10 minutes. You can now carve, tossing the lemon and onion that were in the cavity, and enjoy.
Source: iwanttocook.com (defunct blog)


